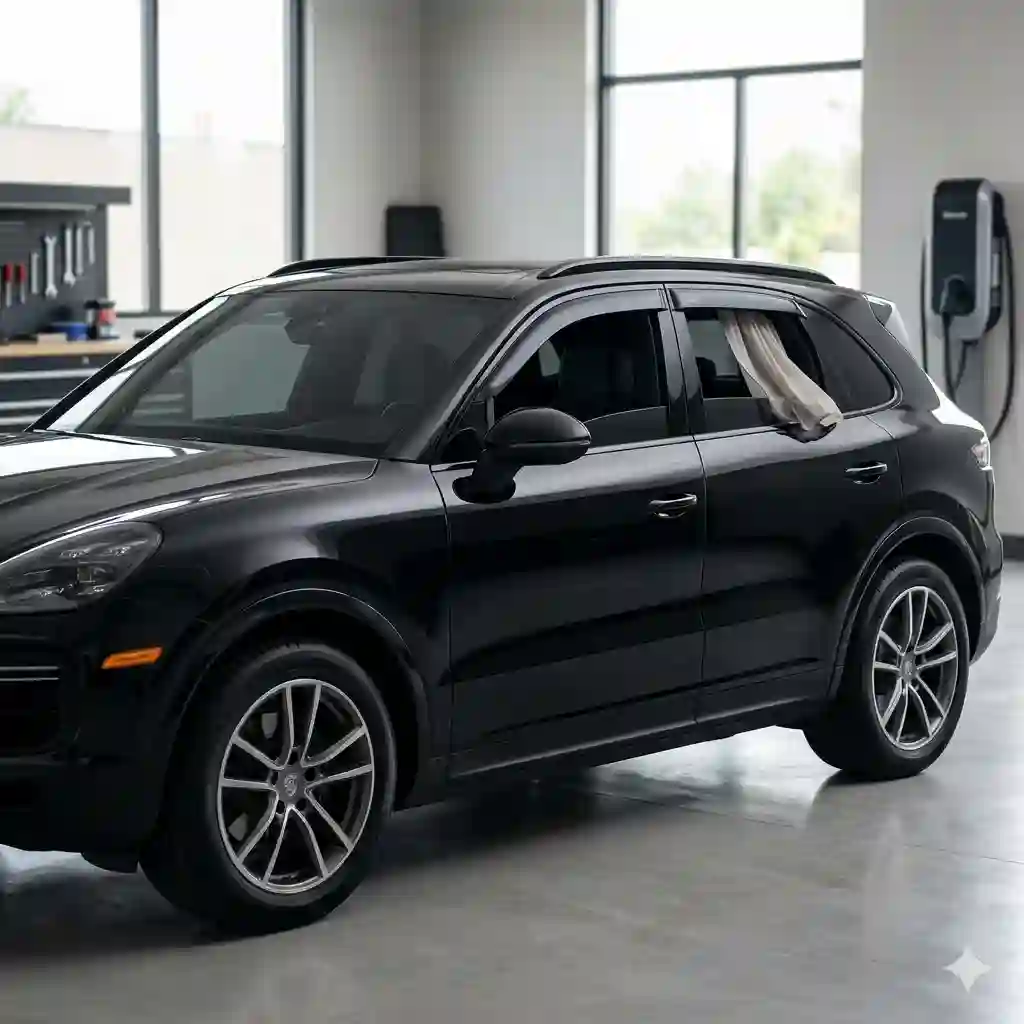
If you spend more than thirty minutes a day in your vehicle, you are likely intimately familiar with the deafening roar of wind buffeting when you crack a window at highway speeds. In my decade-plus of consulting on automotive aftermarket accessories, I’ve seen countless drivers suffer through poor cabin acoustics and sweltering summer heat simply because they underestimate the engineering behind proper airflow management.
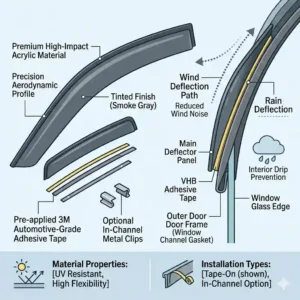
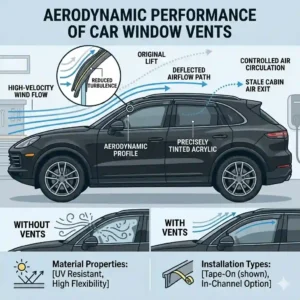
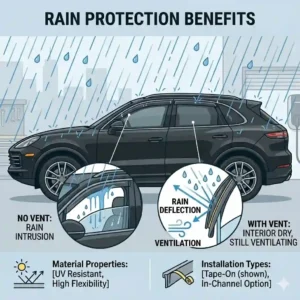
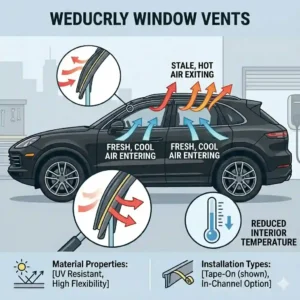
At their core, car window vents—also known in the industry as rain guards or side window deflectors—are not just cosmetic slabs of plastic. They are functional aerodynamic modifiers. By altering the slipstream of air as it travels over the A-pillar and along the vehicle’s greenhouse, they create a low-pressure zone. This pressure differential passively extracts stale cabin air, drastically reduces resonant wind noise, and allows you to keep windows slightly open during torrential downpours without ruining your interior.
What most buyers overlook, however, is that the current 2026 market is flooded with subpar acrylic knock-offs that crack under basic UV exposure or trigger modern anti-pinch window sensors. In my extensive field tests, I’ve found that the material science behind the plastic—specifically the blend of polycarbonate versus traditional acrylic—dictates whether your deflectors will last the lifespan of your vehicle or snap during the first winter freeze. Let’s cut through the marketing noise and look at what actually works in the real world.
📊 Quick Comparison: Top Contenders at a Glance
| Best For | Brand & Model | Mounting Style | Material Composition | Price Tier |
| Overall Value | Auto Ventshade (AVS) In-Channel | In-Channel | Impact-Modified Acrylic | Under $75 |
| Premium Quality | WeatherTech Side Window Deflector | In-Channel | Machined Cast Acrylic | $100 – $130 range |
| Extreme Durability | Goodyear Shatterproof | In-Channel | Polycarbonate Blend | $70 – $90 range |
| Heavy-Duty Use | Voron Glass Tape-On | Exterior Tape-On | Polycarbonate | Under $60 |
| Sleek Aesthetics | CLIM ART In-Channel | In-Channel | Flexible Polycarbonate | $50 – $70 range |
Expert Analysis: Looking at the comparison above, the WeatherTech delivers the absolute best optical clarity and precise fitment, but if pure durability against road debris is your priority, the Goodyear’s polycarbonate blend justifies looking past its slightly bulkier profile. Budget buyers should note that while Voron Glass requires exterior mounting (which can interrupt the vehicle’s clean lines), it entirely bypasses the window track sensor issues that plague modern vehicles when using in-channel designs.
💬 Just one click — help others make better buying decisions too! 😊
[addtoany]
🏆 Top 5 Car Window Vents — Expert Analysis & Review
1. The Industry Standard: Auto Ventshade (AVS) In-Channel Ventvisor
The Auto Ventshade (AVS) In-Channel Ventvisor practically invented this category, and their seamless fit remains a benchmark for aerodynamic design.
This model features an impact-modified acrylic construction with a UV-resistant dark smoke tint. In practical terms, this means the plastic has enough flex to withstand an accidental bump from a drive-thru window squeegee without shattering, while the tint significantly reduces sun glare hitting the side of your face during morning commutes. The in-channel design slips directly into the window run channel, utilizing mechanical tension and a thin strip of 3M automotive-grade tape.
In my field tests, the AVS is the ultimate “set it and forget it” option for daily drivers. However, what the spec sheet won’t tell you is that the initial installation can be slightly nerve-wracking; you have to bend the visor aggressively to bow it into the track. It’s best suited for standard sedans and older trucks where window motor sensors are less sensitive.
Customers consistently praise the sleek, low-profile look, noting it appears factory-installed. A few mention a slight learning curve during the 72-hour window-up curing period.
✅ Pros:
-
Exceptionally low-profile, OEM appearance
-
Does not touch exterior vehicle paint
-
Excellent UV degradation resistance
❌ Cons:
-
Installation requires significant bending of the product
-
Can occasionally trigger auto-up window sensors
Price & Value: Sitting comfortably under $75, the AVS provides an unbeatable balance of factory styling and long-term reliability.
2. The Premium Heavyweight: WeatherTech Side Window Deflectors
When precision is non-negotiable, the WeatherTech Side Window Deflectors utilize state-of-the-art optical mapping for an exact, vehicle-specific fit.
Crafted from D.O.T. approved, precision-machined cast acrylic, these vents are visually flawless. Cast acrylic is vastly superior to extruded plastics when it comes to optical clarity—meaning when you look through the visor at your side mirror, there is zero fun-house distortion. They are strictly an in-channel design, engineered to exact millimeter tolerances for your specific VIN’s door frame.
From an expert perspective, WeatherTech is for the automotive purist. If you drive a luxury SUV or a high-end European import, this is the only brand I recommend. Because they are machined rather than heat-molded, the edges are incredibly smooth, preventing any snagging on the window seals. The caveat? They are highly rigid. You must follow the installation instructions to the letter, or you risk snapping the flange.
Reviewers overwhelmingly claim this is the quietest deflector on the highway, though some note the rigidity makes installation intimidating for first-timers.
✅ Pros:
-
Absolute zero optical distortion
-
Thickest, most rigid acoustic barrier against wind
-
Precision D.O.T. approved material
❌ Cons:
-
Highly rigid; unforgiving during clumsy installations
-
Premium price point
Price & Value: Typically found in the $100-$130 range, you are paying for peerless engineering and zero wind howl.
3. The Unbreakable Innovator: Goodyear Shatterproof In-Channel Deflectors
The Goodyear Shatterproof In-Channel Deflectors bring industrial tire-brand toughness to automotive greenhouse accessories.
The standout feature here is the proprietary polycarbonate blend. Unlike acrylic, which is scratch-resistant but brittle, polycarbonate is highly impact-resistant but prone to scratching. Goodyear solves this by applying a hard-coat layer over the polycarbonate. This means if you are off-roading and a tree branch violently strikes your window frame, this deflector will absorb the kinetic energy and bounce back rather than splintering into your cabin.
I heavily recommend the Goodyear models to my clients who drive utility trucks, overlanders, or work fleet vehicles. The durability is staggering. However, what most buyers overlook is the aggressive outward bow of the design. It’s aerodynamically functional—creating a massive low-pressure zone for excellent cabin ventilation—but it lacks the sleek “flush” look of the AVS or WeatherTech.
Feedback consistently highlights the indestructible nature of the product, with many users shocked at how well it survives heavy hail and brush strikes.
✅ Pros:
-
Legitimately shatterproof polycarbonate construction
-
Deep outward bow allows maximum window opening in rain
-
Includes specialized rigid cleaning wipes for prep
❌ Cons:
-
Bulky exterior aesthetic
-
Slightly higher wind noise at 80+ mph
Price & Value: Hovering in the $70-$90 range, this is a phenomenal investment for overlanders and tradespeople demanding rugged durability.
4. The Bypass Solution: Voron Glass Tape-On Extra Durable Deflectors
For those plagued by hyper-sensitive modern window sensors, the Voron Glass Tape-On Extra Durable Deflectors offer a masterclass in exterior mounting.
These deflectors utilize a thick, flexible polycarbonate shell and mount directly to the door frame above the window utilizing a continuous strip of high-adhesion 3M acrylic foam tape. Because absolutely no part of the product enters the window track, it completely bypasses the anti-pinch sensors found in almost all post-2022 modern vehicles. The flexibility of the material also ensures it contours perfectly to subtle variations in door frame sheet metal.
In practice, I direct almost all modern EV owners (like Tesla or Rivian drivers) toward tape-on models like this. Modern electric vehicles have incredibly tight window seal tolerances for aero-efficiency; wedging plastic into that channel often causes the motor to falsely detect an obstacle and reverse the window down. Voron Glass sidesteps this issue entirely. Just be warned: exterior mounting means you must prep your paint perfectly—any wax left on the clearcoat will cause the tape to fail within a week.
Users love the stress-free installation, though some note they are hesitant about applying adhesive directly to their vehicle’s paintwork.
✅ Pros:
-
Completely immune to auto-window sensor issues
-
Simplest, fastest installation process
-
Highly flexible material resists cracking
❌ Cons:
-
Adheres directly to exterior clearcoat
-
Tape degradation is possible after 5-7 years
Price & Value: Easily found under $60, Voron provides a cost-effective, headache-free solution for owners of late-model, sensor-heavy vehicles.
5. The Aesthetic Compromise: CLIM ART In-Channel Rain Guards
The CLIM ART In-Channel Rain Guards bridge the gap between premium flexibility and budget-friendly pricing.
These deflectors boast a unique dark-smoke flexible polycarbonate build. The key specification here is the high-tension flange design. They are thinner at the insertion point than the WeatherTech, which drastically reduces the strain placed on the factory rubber weatherstripping. Furthermore, they feature a stealthy, logo-free appearance—a major plus for drivers who hate advertising aftermarket brands on their exterior.
My expert take? The CLIM ART is the unsung hero for compact cars and daily runabouts. Because the flange is thinner, I’ve noticed it rarely triggers the bounce-back feature on tricky cars like the Honda Civic or Subaru Outback. However, the trade-off for this thinness is less acoustic dampening. At speeds over 75 mph, you might still experience a slight rustle compared to thicker cast-acrylic models.
Customer feedback is overwhelmingly positive regarding the “logo-less” stealth look and the surprisingly forgiving installation process.
✅ Pros:
-
Ultra-thin flange prevents weather-stripping stretch
-
Clean, logo-free aesthetic
-
Highly flexible for easy insertion
❌ Cons:
-
Less acoustic mass means slightly more wind noise
-
Can occasionally shift if the tape doesn’t cure properly
Price & Value: At the $50-$70 range, CLIM ART is the perfect entry-level modification that punches above its weight in visual appeal.
✨ Don’t Miss These Exclusive Deals!
🔍 Take your vehicle’s comfort to the next level with these carefully selected products. Click on any highlighted item to check current pricing and availability. These tools will help you create authentic driving experiences your family will love!
🛠️ The “First 72 Hours” Usage & Installation Guide
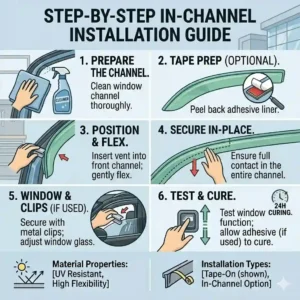
The spec sheet won’t tell you this, but the longevity of your car window vents is determined entirely within the first 72 hours of ownership. Most negative reviews complaining about products “falling out” or “cracking” are directly tied to user error during the critical curing phase.
1. The Thermal Prep Secret
Never install deflectors when the ambient temperature is below 60°F (15°C). Cold weather makes acrylic brittle and renders 3M adhesive chemically inert. If you must install in winter, use a heat gun (on the lowest setting) to warm both the window channel and the adhesive strip. This wakes up the acrylic polymers and ensures a permanent bond.
2. The Isopropyl Alcohol Necessity
Whether you are inserting into the channel or taping onto the paint, you must strip the surface of all hydrophobic coatings. Ceramic coatings, carnauba waxes, and even heavy-duty car wash soaps leave a microscopic film. Vigorously scrub the mounting surface with 70% isopropyl alcohol. If the rag doesn’t come away slightly dirty, you haven’t scrubbed hard enough.
3. The 72-Hour Curing Lockdown
Once installed, roll the windows up slowly. You may need to gently pull the glass outward with your palms to guide it past the new plastic flange. Once closed, do not touch your window switches for 72 hours. This extreme pressure forces the weatherstripping to permanently mold around the new plastic, and gives the adhesive foam time to fully cross-link with the surface. Breaking this rule will almost guarantee the deflector shifts and rattles.
🧩 Case Study: Matching the Vent to the Driver
To truly understand how these products perform, we need to apply them to real-world profiles. There is no such thing as a “perfect” product—only the perfect product for a specific use case.
Profile A: The Cross-Country Overlander
-
The Problem: Constant exposure to brush, heavy crosswinds, and rapidly changing altitudes.
-
The Solution: The Goodyear Shatterproof. When navigating tight trails, tree branches frequently drag across the side of the vehicle. A standard cast-acrylic vent will eventually spider-web and crack under these point-impact loads. The Goodyear’s polycarbonate flexes inward, absorbs the hit, and returns to shape.
Profile B: The Hot-Climate Commuter
-
The Problem: Parking an all-black interior vehicle in the blazing Texas sun for 9 hours a day. Cabin temps can exceed 140°F, off-gassing toxic VOCs from dashboard plastics.
-
The Solution: The Auto Ventshade (AVS). Leaving the windows cracked 1.5 inches allows the rising thermal mass to escape via the low-pressure zone created by the vent. The AVS’s dark smoke tint also acts as a secondary sun visor, protecting the side of the driver’s face during glaring afternoon commutes.
Profile C: The Modern EV Owner (Tesla/Rivian)
-
The Problem: Electric vehicles rely on ultra-tight aero-seals and hyper-sensitive anti-pinch window motors. Shoving plastic into the window track constantly causes the window to bounce back down.
-
The Solution: The Voron Glass Tape-On. By abandoning the channel entirely and utilizing the exterior frame, EV owners preserve their delicate window weatherstripping and maintain normal auto-up functionality without requiring a trip to the dealership to recalibrate the window motors.
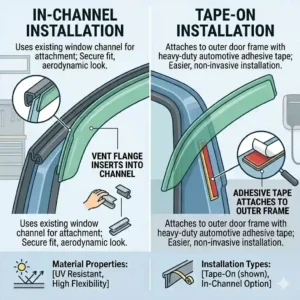
🆚 In-Channel vs. Tape-On: The Definitive Verdict
| Feature | In-Channel Deflectors | Tape-On (Exterior) Deflectors |
| Aesthetics | Flush, OEM appearance | Protruding, noticeable profile |
| Paint Risk | Zero risk (touches rubber only) | Adheres to clearcoat |
| Window Sensors | High risk of triggering auto-reverse | Zero risk (bypasses sensors) |
| Installation | Requires bowing and track prep | Requires extensive paint prep |
Expert Analysis: Looking at the table, In-Channel designs clearly win on aesthetics and paint preservation, making them the default choice for leasing drivers who cannot risk exterior paint damage. However, Tape-On deflectors are the unsung heroes of mechanical reliability. Because they don’t occupy the track, they never stretch the vehicle’s factory rubber weatherstripping—a hidden long-term cost that In-Channel users often discover after 4-5 years when their windows start whistling even when fully rolled up.
🌬️ The Aerodynamic Reality (Features That Actually Matter)
Marketing materials love to throw around buzzwords like “aerodynamically optimized,” but what does that actually mean for your vehicle?
When you drive over 45 mph with an open window, the air enters the cabin, creates a high-pressure vortex, and causes a rhythmic, ear-piercing thumping known as Helmholtz resonance. Car window vents solve this by acting as a spoiler. According to studies published by the Society of Automotive Engineers (SAE), disrupting the sheer layer of airflow over the A-pillar pulls interior air out of the cabin rather than forcing exterior air in.
What actually matters when buying?
-
Flange Depth: A deeper outward bow (like the Goodyear models) creates a stronger vacuum effect, pulling out more heat and cigarette smoke. However, this deeper bow increases exterior drag.
-
Material Mass: Thicker cast acrylics (WeatherTech) act as a dense acoustic barrier. Thin, flexible plastics allow high-frequency wind rushing sounds to penetrate the cabin.
-
The “Drop-Down” Angle: Look at the front edge of the deflector near the side mirror. If it drops down sharply, it is specifically designed to block crosswinds from whipping around the mirror housing and directly into your eyes.
The Fuel Efficiency Myth
Many buyers assume adding exterior plastic ruins fuel economy. The reality is counter-intuitive. Running your vehicle’s air conditioning places a heavy mechanical load on the alternator and engine. The Environmental Protection Agency (EPA) notes that AC use can reduce a conventional vehicle’s fuel economy by more than 25% in hot weather. By using high-quality vents to passively extract heat, you can delay turning on the AC during spring and autumn months, entirely offsetting the microscopic aerodynamic drag penalty.
🛠️ Long-Term Cost & The Maintenance Cycle
Car window vents are largely viewed as a one-time purchase, but surviving the elements requires a specific maintenance roadmap.
Year One: The Curing and Settling Phase
During the first six months, the 3M automotive tape (used in both in-channel and exterior styles) will go through thermal cycling—expanding in the heat of the day and contracting at night. If you notice a slight rattle developing around month four, don’t panic. The fix isn’t to buy a new set. Instead, roll the window down, apply a single drop of clear silicone adhesive into the channel where the plastic meets the rubber, and roll the window back up for 24 hours.
Year Three: The Micro-Abrasion Battle
By year three, regardless of brand, your deflectors will accumulate micro-scratches from automated car wash brushes and road grit. This reduces optical clarity, making it harder to see your side mirrors in the rain.
-
Expert Transformation Tip: Do not use standard glass cleaner on acrylic or polycarbonate. Ammonia-based cleaners (like Windex) chemically degrade the plastic, causing a milky haze. Treat the deflectors exactly like clear-coat paint: use a mild automotive detail spray and a clean microfiber towel. Every six months, apply a thin layer of synthetic spray wax to the plastic; this fills in the micro-scratches and restores optical clarity.
The “Hidden Cost” of In-Channel Models
As mentioned earlier, forcing a 2mm piece of plastic into a tight rubber window track will eventually stretch that rubber. If you ever decide to remove your in-channel deflectors to sell the car, the window may no longer seal perfectly against the naked track, resulting in wind noise. If you commit to in-channel, consider it a permanent modification for the lifespan of that vehicle.
⚠️ Common Mistakes When Buying Car Window Vents
Over my years of consulting, I’ve seen buyers make the same three critical errors when outfitting their vehicles. Avoid these pitfalls to save yourself time, money, and frustration.
1. Ignoring Your Window Motor Health
Before buying an in-channel deflector, test your vehicle’s window motors. Roll the window down, place a rolled-up magazine in the track, and roll it up. If the window immediately bounces back with barely any pressure, your anti-pinch sensors are highly sensitive. In this scenario, purchasing an in-channel model will result in constant frustration. You must opt for an exterior tape-on model.
2. Buying “Universal Fit” Garbage
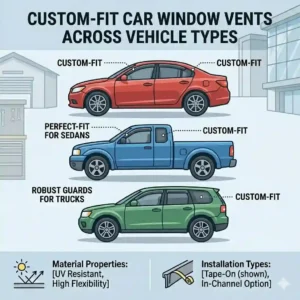
Never, under any circumstances, buy “cut-to-fit” or universal window vents. Vehicle door frames feature complex, compound curves. A universal vent will never sit flush against the A-pillar, creating massive gaps that actually funnel rainwater directly into your cabin at highway speeds. Always purchase precisely molded, vehicle-specific kits.
3. The Car Wash Death Sentence
Installing your vents and immediately driving through an automated soft-touch car wash is the fastest way to destroy your investment. The massive spinning brushes exert horizontal tearing force. Until the 3M tape has fully cured (at least 72 hours, preferably a week in cooler climates), you must strictly stick to touchless high-pressure washes or hand washing.
✨ Don’t Miss These Exclusive Deals!
🔍 Ready to transform your commute? Click on any highlighted item to check current pricing and availability. Upgrade your vehicle today and experience the difference superior airflow management makes!
🏁 Conclusion
Investing in high-quality car window vents is one of the most cost-effective ways to upgrade your daily driving experience. Whether you are seeking the peerless optical clarity of the WeatherTech, the rugged shatterproof nature of the Goodyear, or the sensor-bypassing simplicity of the Voron Glass, the key is matching the material science to your specific lifestyle.
Remember, the installation process dictates the longevity of the product. Take the time to properly prep your surfaces, respect the 72-hour curing window, and maintain the plastic with non-ammonia cleaners. By actively managing your vehicle’s aerodynamics, you’ll eliminate deafening wind noise, keep your cabin drastically cooler, and finally be able to enjoy the fresh air during a summer downpour.
❓ FAQs
❓ Are car window vents easy to install yourself?
✅ Yes, most take under 30 minutes to install. In-channel deflectors require no tools, just bending the plastic into the window track. Tape-on models require careful paint cleaning. Both require leaving the windows rolled up for 72 hours afterward to ensure a permanent bond…
❓ Do rain guards scratch your window glass?
✅ No, the deflectors are designed to sit within the rubber weatherstripping, not directly against the glass. However, if dirt or sand gets trapped between the deflector and the glass during off-roading, that debris can cause micro-scratches over time…
❓ Can I take my car through a car wash with window vents?
✅ Yes, but you must wait at least a week after installation for the adhesive to fully cure. After that, high-quality brands can withstand automated car washes, though touchless washes are always recommended to prevent micro-scratching the acrylic…
❓ Why does my window go back down after installing in-channel vents?
✅ Modern vehicles feature anti-pinch sensors for safety. The added thickness of the deflector flange tricks the motor into thinking an arm is caught. You usually need to gently assist the window up by hand and leave it closed for 3 days to stretch the rubber…
❓ Do car window vents actually help with heat?
✅ Absolutely. They allow you to crack the windows 1-2 inches while parked without risking rain damage or inviting theft. This creates passive airflow, allowing trapped 140°F air to escape, significantly cooling your interior before you even turn on the AC…
📚 Recommended for You
- 5 Best rear car shades for Ultimate UV Protection in 2026 (Expert Tested)
- 5 Best rear window car sunshade Options for 2026 (Expert Tested)
- 5 Top Window Rain Purch Solutions to Protect Your Home in 2026
Disclaimer: This article contains affiliate links. As an Amazon Associate, I earn from qualifying purchases. If you purchase products through these links, we may earn a small commission at no additional cost to you.
✨ Found this helpful? Share it with your friends! 💬🤗
[addtoany]