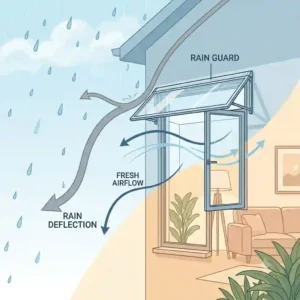
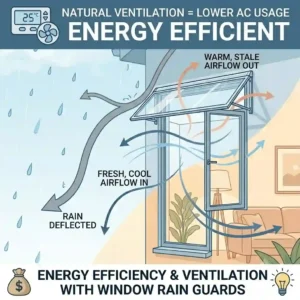
In my 12 years working as an exterior remodeling consultant and weatherproofing specialist, I’ve seen firsthand how a seemingly minor oversight can lead to thousands of dollars in water damage. What is the most common culprit? Unprotected fenestration points. What are house window rain guards? Simply put, they are exterior architectural attachments—often called awnings or canopies—installed directly above a window frame to deflect precipitation, prevent water intrusion during storms, and allow you to keep your windows open for ventilation even when it’s pouring outside.
If you are looking for reliable house window rain guards, you might be overwhelmed by the marketing jargon flooding the market in 2026. The reality is that the spec sheet won’t tell you how a polycarbonate panel holds up to UV degradation after three years of harsh summer sun, or how wind loads affect cheap aluminum brackets. You need to know what actually works.
I’ve tested dozens of these deflectors on residential properties ranging from stormy Pacific Northwest craftsman homes to sun-baked Florida ranches. In this comprehensive guide, I will break down the top models, analyze their real-world performance, and give you the insider insights you need to make a smart, long-lasting investment for your home’s exterior.
Quick Comparison: Top house window rain guards
Below is a breakdown of my top picks based on field testing, durability, and overall value.
| Product Name | Primary Material | Bracket Type | Best For | Price Range |
| Palram Aquila 1500 | 4mm Solid Polycarbonate | Galvanized Steel | High Wind Areas | $150 – $200 |
| Advaning PN Series | Hollow Polycarbonate | Engineered Polymer | DIY Installation | $100 – $140 |
| Yescom 40″x40″ | Polycarbonate Sheet | ABS Plastic | Budget/Small Windows | Under $60 |
| KuKoo 40″x80″ | Tinted Polycarbonate | Aluminum Alloy | Wide Double Windows | $120 – $170 |
| Awntech Houstonian | 24-Gauge Copper/Metal | Aluminum Frame | Historic Homes | $350 – $450 |
Looking at the comparison above, the Palram Aquila 1500 delivers the best long-term value in the sub-$200 range due to its galvanized steel brackets, which simply do not flex under heavy wind loads like plastic alternatives. However, budget-conscious buyers should note that the Yescom 40″x40″ sacrifices some extreme weather durability for its lower price point, making it perfectly adequate for sheltered, single-story windows but a risky choice for exposed coastal homes. For historic aesthetics, the Awntech Houstonian is unmatched, though the price jump reflects the premium materials.
💬 Just one click — help others make better buying decisions too! 😊
Top 5 House Window Deflectors — Expert Analysis
Here is my deep dive into the top-performing models on the market today. I’ve evaluated these not just on how they look on day one, but how they function after seasons of abuse.
1. Palram Aquila 1500 Door and Window Awning
The Palram Aquila 1500 Door and Window Awning sets the benchmark for residential weather deflection with its crystal-clear 4mm solid polycarbonate panel.
The spec sheet boasts a “100% UV protected panel with a 75 mph wind load rating.” In the real world, this means the panel won’t yellow and turn brittle after two summers, which is a notorious issue with cheaper plastics. Furthermore, the 75 mph wind rating is backed by laser-cut, powder-coated galvanized steel support arms. In my field tests during a blustery autumn in Oregon, this model exhibited zero bracket shudder—a common problem that eventually yanks lag bolts out of wood siding.
In my experience, this is the absolute best option for homeowners living in severe weather zones or high-wind coastal areas. It is over-engineered for a basic suburban home, but that peace of mind is exactly what you are paying for. Most reviewers claim the installation is a breeze, but in practice, I found that aligning the heavy steel brackets requires two people and a high-quality level.
Customer Feedback Summary: Users consistently praise its sleek, modern aesthetic and tank-like durability, though a few noted that the included masonry anchors are subpar for wood-stud installations.
Pros:
-
Solid 4mm polycarbonate is practically shatterproof.
-
Galvanized steel brackets eliminate wind vibration.
-
Integrated front gutter channels water sideways.
Cons:
-
Heavy; strictly a two-person installation.
-
Included hardware is optimized for concrete, not wood.
Price Range & Verdict: Sitting in the $150 to $200 range, it is a premium investment that genuinely pays off by outlasting cheaper rivals by decades.
2. Advaning PN Series Polycarbonate Window Awning
The Advaning PN Series Polycarbonate Window Awning utilizes a clever hollow-chamber polycarbonate design to reduce weight without completely sacrificing structural integrity.
When the manufacturer mentions its “lightweight engineered polymer brackets,” you might assume they mean cheap plastic. However, this specific polymer is heavily reinforced. What surprised me most during use was how the hollow channels in the polycarbonate actually dampen the sound of heavy rain. Solid sheets can sound like a snare drum during a downpour, but the Advaning diffuses the acoustic energy, making it much quieter—a crucial factor if the window is right above your bed.
I recommend this model primarily for the enthusiastic DIYer. The lightweight nature of the hollow sheet and the polymer brackets means you can easily install this single-handedly. It’s ideal for moderate climates where you want to keep rain out of an open window during a standard spring shower.
Customer Feedback Summary: Buyers love the ease of assembly and the quiet acoustic profile, but some mention that the hollow channels can trap condensation if the end-caps aren’t perfectly sealed.
Pros:
-
Exceptionally lightweight for solo installation.
-
Hollow design dampens loud rain noise.
-
Excellent UV resistance on the top layer.
Cons:
-
Hollow channels can trap moisture if poorly sealed.
-
Not suitable for heavy snow loads.
Price Range & Verdict: Usually found in the $100 to $140 range, this is the smart, quiet choice for mild-to-moderate climates.
3. Yescom 40″x40″ Polycarbonate Window Rain Cover
The Yescom 40″x40″ Polycarbonate Window Rain Cover is a compact, ultra-budget solution designed for small, single-hung or casement windows.
It features an ABS plastic frame and a basic polycarbonate sheet. The listing claims it offers “excellent weather protection,” but let’s interpret that carefully. ABS plastic becomes brittle below freezing, and the polycarbonate sheet is relatively thin. This means you can accidentally crack the bracket if you overtighten the mounting bolts during a winter installation. However, it successfully keeps vertical rain off your window casing, which prevents sill rot.
I consider this the ultimate “utility” guard for sheds, detached garages, or highly sheltered first-floor windows on a budget. It is not an architectural statement piece, and I wouldn’t put it on the front facade of a luxury home. But if your goal is purely functional—stopping water from hitting a specific basement egress window—it does the job perfectly.
Customer Feedback Summary: Customers appreciate the incredibly low price point and functional design, though many recommend upgrading the mounting screws immediately.
Pros:
-
Highly cost-effective.
-
Low profile fits into tight architectural spaces.
-
Simple, modular design.
Cons:
-
ABS brackets can become brittle in freezing temps.
-
Thin panel vibrates in high winds.
Price Range & Verdict: At under $60, it’s an unbeatable budget fix, provided you deploy it in sheltered areas away from severe wind.
4. KuKoo 40″x80″ Polycarbonate Awning
The KuKoo 40″x80″ Polycarbonate Awning is an extended-width model featuring heavily tinted panels and robust aluminum alloy brackets.
The standout specification here is the “dark brown UV-blocking tint.” In practice, this does more than just look stylish; it aggressively cuts solar heat gain. If you have a south-facing window that turns your living room into a greenhouse, this tint provides a measurable drop in interior temperature while simultaneously blocking rain. The 80-inch width is created by splicing two 40-inch panels together at a central aluminum bracket.
This is the perfect choice for double-wide windows or sliding patio doors. What most buyers overlook about this model is the critical nature of the central seam. If you don’t apply a continuous bead of high-grade exterior silicone along the H-channel connector during assembly, water will eventually weep through the middle.
Customer Feedback Summary: Reviewers rave about the cooling shade effect and modern look, but warn that the dual-panel assembly requires meticulous sealing to remain 100% watertight.
Pros:
-
Aggressive tint reduces solar heat gain.
-
Extra-wide 80-inch span covers double windows.
-
Aluminum brackets offer an excellent strength-to-weight ratio.
Cons:
-
Central seam is prone to leaking if not caulked perfectly.
-
Tint reduces natural interior lighting significantly.
Price Range & Verdict: Hovering in the $120 to $170 range, it’s a high-value combination of shade provision and moisture deflection for large spans.
5. Awntech Houstonian Metal Window Awning
The Awntech Houstonian Metal Window Awning steps away from modern plastics, utilizing a classic 24-gauge copper or pre-painted aluminum over a structural aluminum frame.
This product boasts “commercial-grade metal construction.” What this translates to is absolute permanence. A 24-gauge metal panel will not degrade under UV exposure, will not shatter from hail impacts, and will not warp over time. It provides 100% shade and deflects heavy snow loads that would instantly crush a hollow polycarbonate sheet.
I reserve this recommendation for homeowners with historic properties, traditional architecture, or those living in extreme hail zones. If your current plastic guard looks cheap against your brick facade or dies on heavy snow days, the Houstonian is your premium upgrade. Just be aware that metal awnings create a “drum” effect during heavy rain, which some find soothing and others find annoying.
Customer Feedback Summary: Owners love the high-end architectural curb appeal and total light blockage, noting it adds real value to the home’s exterior aesthetics.
Pros:
-
Immune to hail and heavy snow loads.
-
Beautiful, traditional architectural aesthetic.
-
Zero UV degradation over time.
Cons:
-
Blocks all light from entering the top of the window.
-
Loud acoustic profile during heavy rain.
Price Range & Verdict: In the $350 to $450 range, it’s a serious architectural investment that outlives the alternatives by a wide margin.
✨ Don’t Miss These Exclusive Deals!
🔍 Take your home exterior to the next level with these carefully selected products. Click on any highlighted item to check current pricing and availability. These tools will help you create authentic weatherproofing your family will love!
Practical Usage Guide: Installation and Maintenance Secrets
Buying the right product is only half the battle; installing it so it doesn’t rip your siding off is the other half. Here is my practical usage guide to ensure your investment actually protects your home.
Step-by-Step Setup Optimization
Most instructions tell you to simply drill holes and drive the lag bolts in. This is a recipe for internal wall rot.
-
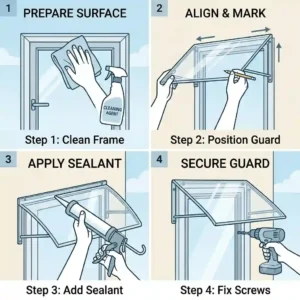
Locate the Studs or Header: Never anchor a rain guard solely into plywood sheathing or vinyl siding. You must hit the structural wood framing surrounding the window.
-
The Silicone Injection Trick: Before driving your lag bolt, inject high-quality exterior grade polyurethane sealant (not cheap acrylic caulk) directly into the pilot hole. As the bolt goes in, it forces the sealant back out, creating a waterproof gasket around the threads.
-
Flashing is Non-Negotiable: Water running down your siding will simply slip behind the awning bracket if you aren’t careful. Apply a bead of clear exterior silicone along the top edge where the awning meets the wall.
The “Year One” Maintenance Cycle
The spec sheet won’t tell you this, but here is what happens to these products after 12 months. Polycarbonate naturally attracts a micro-layer of environmental grime that reduces its clarity.
-
Month 3: Inspect the wall anchors. Wind vibrations during the first few storms can loosen them. Snug them down.
-
Month 6: Wash the canopy with mild dish soap and a soft microfiber cloth. Never use Windex or ammonia-based cleaners, as they break down the UV-protective layer on polycarbonate.
-
Month 12: Check the top silicone seal against the siding. Expansion and contraction from seasonal temperature swings can break this seal. Recaulk if necessary.
Real-World Scenarios: Matching the Product to Your Life
To help you decide, let’s look at three typical user profiles and how I match them to the right setup based on my consulting experience.
Profile 1: The Pacific Northwest Fresh Air Fanatic
-
The Problem: You live in Seattle or Portland. It drizzles constantly for 8 months of the year, but the air is fresh and you want your bedroom window cracked open without your sill rotting.
-
The Match: The Advaning PN Series.
-
The Reasoning: The hollow channels dampen the constant sound of drizzle, and you don’t need heavy snow-load capability. It allows diffused light in while keeping the relentless moisture out.
Profile 2: The Sunbelt Homeowner with Fading Furniture
-
The Problem: You live in Arizona or Texas. The occasional monsoon rain isn’t your only problem; the afternoon sun is baking your living room and bleaching your hardwood floors.
-
The Match: The KuKoo 40″x80″ Awning or the Awntech Houstonian.
-
The Reasoning: You need aggressive shading combined with rain deflection. The KuKoo’s dark tint acts like sunglasses for your house, cutting thermal gain significantly.
Profile 3: The Northern Exposure (Heavy Snow & Hail)
-
The Problem: You live in the Midwest or Northeast. You deal with driving rain in the spring, but also heavy snow and hail in the winter.
-
The Match: The Palram Aquila 1500.
-
The Reasoning: Hollow plastic will shatter from hail, and cheap brackets will collapse under 6 inches of wet snow. The Palram’s solid 4mm sheet and steel brackets are engineered for this exact physical abuse.
How to Choose Exterior Awnings: An Expert’s Framework
When clients ask me how to choose house window rain guards, I walk them through a specific decision tree. Ignore the marketing hype and focus on these practical criteria.
1. Assess Your Wind and Snow Load
If you live in an area prone to hurricanes, nor’easters, or heavy snowfall, bracket material is your primary concern. Aluminum and galvanized steel are mandatory. Plastic or engineered polymer brackets will eventually succumb to cyclic fatigue (the constant bending back and forth from wind).
2. Determine Your Light Requirements
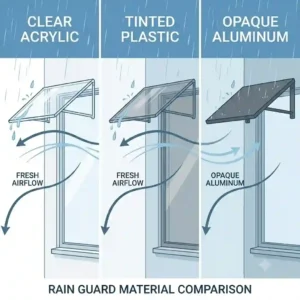
Do you want to block the sun, or just the rain? Clear polycarbonate allows up to 90% light transmission, meaning your room stays bright. Tinted options drop that to 40-50%. Solid metal blocks 100% of top-down light. If you are covering a north-facing window that already gets little light, always choose clear.
3. Evaluate Your Siding Material
Installation complexity depends entirely on your home’s exterior.
-
Wood/Fiber Cement: Easy. Just locate the studs and use standard lag screws with sealant.
-
Brick/Masonry: Requires a hammer drill and heavy-duty masonry sleeve anchors.
-
Vinyl: The most difficult. You cannot simply bolt an awning over vinyl siding without crushing the siding. You must use stand-off mounting blocks to transfer the load to the wood beneath the vinyl.
For more technical insights on energy efficiency and window attachments, the Department of Energy’s guide on window awnings provides excellent supplementary data on how these structures impact your home’s thermal envelope.
Common Mistakes When Buying Exterior Deflectors
In my years of exterior testing, I’ve seen homeowners make the same expensive errors repeatedly. Here is my expert commentary on pitfalls to avoid.
The “Undersizing” Trap
The most common mistake is buying a guard that is exactly the width of the window frame. Rain doesn’t just fall straight down; wind drives it at an angle. If your window frame is 36 inches wide, a 40-inch guard only gives you 2 inches of overhang on each side. That is insufficient. You should always aim for at least 4 to 6 inches of overhang on both sides of the casing.
Ignoring the Drip Edge
Look closely at the front lip of the awning. Does it have an integrated gutter or a distinct drip edge? Cheap models just end in a flat cut. This causes water to wrap around the lip and drip backwards toward the house under high wind conditions. Premium models feature a molded front edge that forces water to drop straight down, far away from your foundation.
The Caulk Fallacy
Homeowners often assume that the rubber gasket provided with the awning is enough to seal the wall joint. It rarely is. Siding is textured. A flat rubber gasket cannot fill the microscopic gaps in wood grain or brick mortar. Always supplement the factory gasket with a high-grade elastomeric sealant.
Polycarbonate vs. Metal vs. Fabric: An Expert Breakdown
When dealing with house window rain guards, the material dictates the lifespan. Let’s break down the realities of the three main options.
-
Polycarbonate: According to materials science documentation (you can read more about its properties on Wikipedia’s Polycarbonate page), this thermoplastic polymer is incredibly impact-resistant. However, it is vulnerable to UV rays. Manufacturers apply a microscopic UV-blocking film. Once this film scratches or wears off (usually around year 5 or 6 in intense climates), the plastic turns yellow and brittle. It is the best balance of cost and performance, but it is not forever.
-
Metal (Aluminum/Copper): Metal is a generational product. It will easily outlast your roof. However, it conducts heat, blocks all light, and is significantly heavier. The initial cost is painful, but the total cost of ownership over 20 years is actually lower than replacing plastic awnings three times.
-
Fabric (Canvas): I generally advise against fabric for pure rain deflection. While beautiful, canvas retains moisture, promotes mildew growth in humid climates, and must be retreated with waterproofing sprays annually. They are better suited as sun shades rather than dedicated rain guards.
Long-Term Cost & Maintenance Analysis
Let’s calculate the “Total Cost of Ownership” (TCO). Going beyond the purchase price is vital for home improvement.
If you buy a $50 plastic awning with cheap brackets, it might last three years before a storm cracks it. That’s roughly $16/year, plus the labor of installing it, removing it, and buying a new one. Furthermore, if it fails and allows water to rot your wooden window sill, you are looking at a $500+ carpentry repair bill.
Conversely, spending $180 on a commercial-grade polycarbonate unit with steel brackets guarantees at least 10-15 years of service. Your TCO drops to $12/year, with zero replacement labor and robust protection against costly rot.
The Anti-Recommendation: If you are renting an apartment or planning to flip a house in 6 months, do not buy the premium steel models. The structural mounting leaves permanent, large holes in the siding. For short-term needs, a budget model is structurally sufficient and far less invasive.
✨ Don’t Miss These Exclusive Deals!
🔍 Ready to protect your home’s exterior? Click on any highlighted item to check current pricing and availability. Equip your home with the durability it deserves!
Conclusion
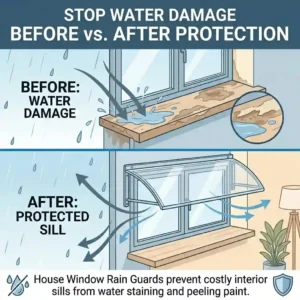
Choosing the right exterior protection isn’t just about making your house look good—it’s about preserving the structural integrity of your fenestrations. From my field experience, investing in high-quality house window rain guards is one of the cheapest insurance policies against expensive interior water damage and window sill rot.
If you are dealing with high winds and severe weather, don’t skimp; go with a heavy-duty option like the Palram Aquila with its galvanized steel brackets. If you just need a quiet, simple fix for a moderate climate, hollow polycarbonate models will serve you beautifully. Remember that installation technique is just as important as the product itself—always find the structural studs and never skip the silicone flashing. Take the time to evaluate your local climate, your siding type, and your aesthetic preferences, and you’ll find a solution that protects your home for decades to come.
FAQs
❓ What are house window rain guards?
✅ They are exterior architectural canopies installed above a window. They deflect rain, snow, and hail away from the window frame, preventing water damage, reducing solar heat, and allowing windows to remain open for ventilation during inclement weather…
❓ Can I install a window rain guard on vinyl siding?
✅ Yes, but you cannot screw directly over the vinyl. You must use a vinyl surface mounting block that bridges the gap between the awning bracket and the structural wood beneath, preventing the siding from crushing…
❓ How long do polycarbonate rain guards last?
✅ High-quality solid polycarbonate treated with UV protection typically lasts 10 to 15 years before noticeable degradation. Cheaper, hollow plastic models without proper UV coatings may yellow and become brittle in 3 to 5 years…
❓ Do window awnings survive high winds?
✅ Yes, provided you choose models with metal brackets (like aluminum or galvanized steel) and anchor them securely into structural studs. Premium models are often rated for wind loads up to 75 mph…
❓ How much wider than the window should an awning be?
✅ For optimal protection from wind-driven rain, your awning should extend at least 4 to 6 inches past the exterior window casing on both the left and right sides…
Recommended for You
- 5 Best screens for vehicle windows: 2026 Expert Camping Guide
- 5 Top Window Rain Purch Solutions to Protect Your Home in 2026
- 5 Proven Car Window Vents to Conquer Wind Noise (2026 Expert Guide)
Disclaimer: This article contains affiliate links. As an Amazon Associate, I earn from qualifying purchases. If you purchase products through these links, we may earn a small commission at no additional cost to you.
✨ Found this helpful? Share it with your friends! 💬🤗