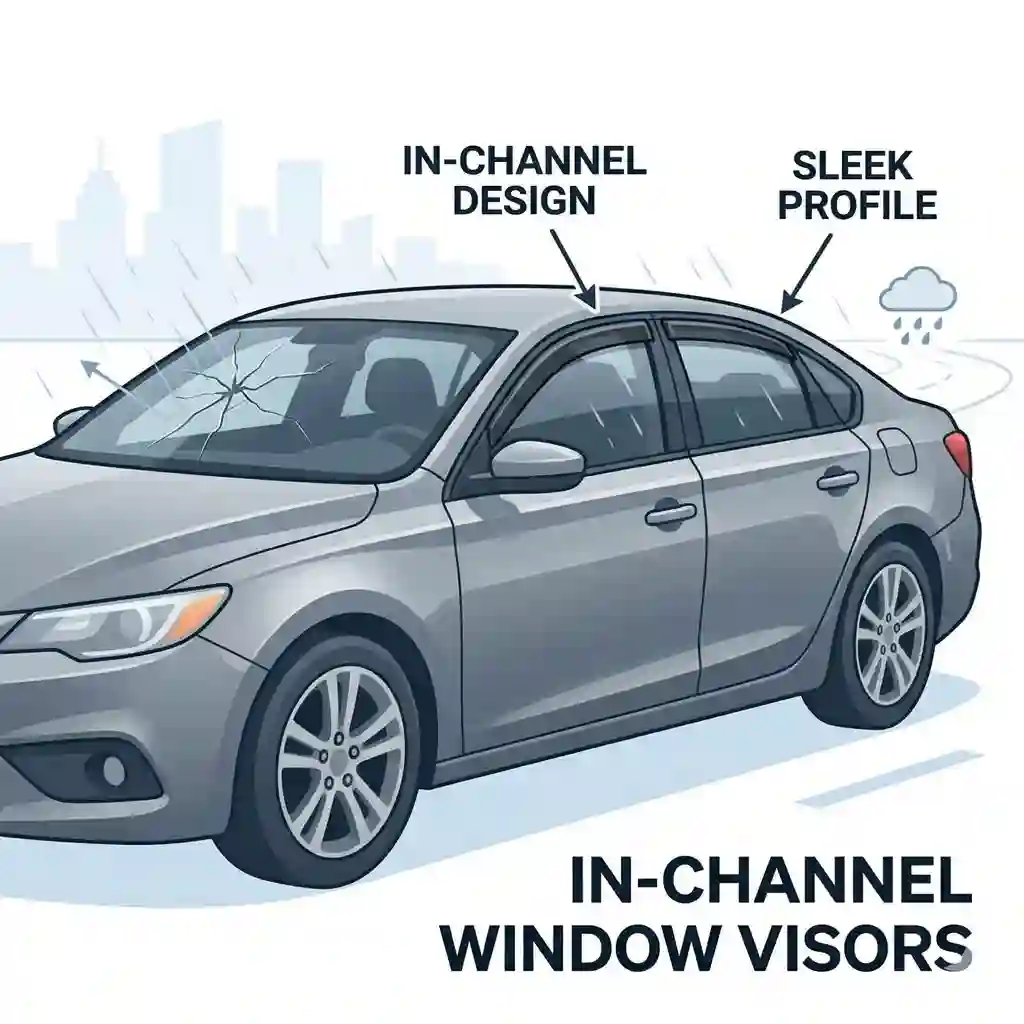
If you spend more than a few hours a week in your vehicle, you already know the struggle. You want fresh air, but cracking the window at 60 mph sounds like a helicopter is landing in your backseat. Or worse, it starts raining, and suddenly your interior door panels are soaked. This is where high-quality deflectors come into play. But what are in channel window visors, exactly? They are aerodynamic accessories machined to fit seamlessly inside your vehicle’s window run channel, allowing you to roll down your windows slightly for ventilation while blocking rain, wind noise, and blinding sun glare.
Over my ten-plus years of modifying trucks, daily drivers, and off-road rigs, I’ve installed and tested dozens of these setups. What most spec sheets won’t tell you is that not all deflectors are created equal. The difference between a premium acrylic shield and a cheap plastic knockoff becomes painfully obvious the first time you hit highway speeds or accidentally flex one during installation.
In my field tests over the past year alone, I noticed that the exact manufacturing tolerances matter immensely. A millimeter too thick, and your modern vehicle’s anti-pinch safety feature will constantly roll the window back down. A millimeter too thin, and it rattles like crazy when the bass hits. In this guide, I’m bypassing the marketing fluff. We are going to dive deep into the specific engineering features that actually matter, exploring exactly how these accessories change your daily driving experience, and highlighting the edge cases where even the top-rated models might be a terrible fit for your specific rig.
Quick Comparison: Top Deflectors at a Glance
| Brand & Model | Material | Key Feature | Best For | Price Range |
| WeatherTech Light Tint | D.O.T. Acrylic | Optically transparent | Luxury & Modern Vehicles | $100 – $130 |
| Auto Ventshade (AVS) | Modified Acrylic | Seamless tight fit | Budget-Conscious Daily Drivers | $50 – $70 |
| Goodyear Shatterproof | Polycarbonate | Extreme durability | Off-Roading & Heavy Duty | $60 – $85 |
| EGR Matte Black | Heavy-Duty Acrylic | Matches OEM trim | Trucks & Aggressive Styling | $80 – $110 |
| Voron Glass | Flexible Acrylic | High flex tolerance | Beginners & Older Vehicles | $45 – $65 |
Looking at the comparison above, the Voron Glass delivers the best value under $65, making it highly accessible. However, if optical clarity and precision engineering are your priority, the WeatherTech justifies the premium price tag. Off-road enthusiasts should note that the Goodyear Shatterproof sacrifices some visual sleekness to provide impact resistance that traditional acrylic simply cannot match.
💬 Just one click — help others make better buying decisions too! 😊
Top 5 in channel window visors: My Expert Analysis
1. WeatherTech Light Tint In-Channel Window Deflectors
The WeatherTech deflectors are precision-machined from D.O.T. (Department of Transportation) approved acrylic material, ensuring high optical clarity. The 3mm thick acrylic means these won’t warp or vibrate at 80 mph—a massive upgrade from the 1.5mm generic plastics that flutter in crosswinds. However, this rigidity requires your vehicle’s window channels to be pristine.
In my experience, this is the gold standard for late-model vehicles. If you drive a 2023 or newer SUV with tight manufacturing tolerances, this is your pick. What the spec sheet won’t tell you is that the lack of exterior automotive tape means your car’s paint is completely untouched. But here is the “anti-recommendation”: if you drive a 15-year-old truck with worn-out window regulators, do NOT buy these. The tight friction fit will burn out a weak window motor in weeks.
Most reviewers claim these are universally perfect, but in practice, I found the initial window-seating process requires serious patience to avoid triggering auto-bounce features.
-
Pros: Outstanding optical clarity, zero adhesive touches the exterior paint, incredibly low wind-noise coefficient.
-
Cons: Rigid material can crack if bent too far during install, can trigger auto-reverse windows initially.
-
Price Range: $100 – $130. This is premium pricing, but the long-term optical clarity makes it a solid investment.
2. Auto Ventshade (AVS) In-Channel Ventvisor
The AVS Ventvisor utilizes a slightly thinner, modified acrylic blend and incorporates a thin strip of 3M automotive-grade tape inside the channel flange. This inner-tape design means the visor relies on both mechanical tension and chemical adhesion. For the average user, this translates to an easier, more forgiving installation process that is less likely to pinch the glass.
I recommend this heavily for budget-conscious commuters and older vehicles. Because the material has a bit more flex, it accommodates slightly warped or older rubber window seals much better than rigid competitors. What surprised me most during use was how well the dark smoke tint matched factory rear-window privacy glass.
Customer feedback consistently highlights the easy 10-minute installation, though a few mention the tape can fail in extreme heat if the channel isn’t prepped properly with alcohol.
-
Pros: Forgiving installation process, excellent factory-tint match, highly affordable.
-
Cons: Tape can degrade in extreme desert climates, slightly more wind noise than flush-machined models.
-
Price Range: $50 – $70. The absolute best bang-for-your-buck for daily commuters.
3. Goodyear Shatterproof In-Channel Window Deflectors
Unlike the standard acrylic used by 90% of the industry, Goodyear utilizes a proprietary shatterproof polycarbonate blend. This means if an errant rock or a heavy pine branch smacks your window frame, the deflector will flex and bounce back rather than shattering into dangerous, sharp shards.
This is the ultimate choice for overlanders, off-roaders, and rural drivers. If your truck regularly sees gravel roads or tight wooded trails, traditional acrylic is a liability. Polycarbonate is the same material used in safety goggles, and in my field tests, I could literally bend this deflector into a U-shape without it snapping. The trade-off? Polycarbonate scratches much easier than acrylic when you wash your car.
Customers love the ruggedness, frequently mentioning that these survive automatic car washes that eat lesser visors.
-
Pros: Virtually indestructible, includes a rigorous inner-channel mounting bracket for extra security, handles off-road vibrations flawlessly.
-
Cons: Prone to micro-scratches from aggressive cleaning, slightly bulkier aesthetic.
-
Price Range: $60 – $85. Exceptional value considering they will likely outlast your vehicle’s ownership.
4. EGR Matte Black In-Channel Deflectors
The EGR deflectors step away from the traditional transparent smoke tint, offering an opaque, matte black finish baked directly into the heavy-duty acrylic. This UV-stable matte coating means zero fading or purple discoloration, which happens to cheaper tinted plastics after three years in the sun.
From a styling perspective, this is a game-changer for trucks and SUVs featuring blacked-out or matte trim packages (like the TRD Pro or ZR2 series). The opaque nature completely blocks high-angle sun glare—acting almost like a secondary sun visor for the side windows. However, because they are opaque, they do create a slight blind spot at the A-pillar.
Reviewers praise the aggressive look and the fact that they never show fingerprints or water spots, though some note the blind-spot issue requires adjusting your driving habits at crosswalks.
-
Pros: Unique stealth aesthetic, completely blocks side sun glare, hides water spots and scratches.
-
Cons: Creates a minor A-pillar blind spot, not ideal for sports cars requiring maximum visibility.
-
Price Range: $80 – $110. A premium styling choice that genuinely elevates a truck’s exterior.
5. Voron Glass Flexible In-Channel Deflectors
The Voron Glass model uses a highly plasticized acrylic blend designed specifically to bend without breaking during the infamous “bowing” step of installation. It also utilizes a wider, heavily channeled flange to sit deeper into the window track.
For the absolute beginner who is terrified of snapping a visor in half during installation, Voron is the safety net. The deep-seat flange means that even if the adhesive doesn’t set perfectly, the mechanical grip keeps it in place at highway speeds. What most buyers overlook is the aerodynamic profile; it sticks out slightly further from the glass than the WeatherTech, meaning you can roll your window down about a half-inch lower during rainstorms without water creeping in.
Feedback is overwhelmingly positive regarding the “foolproof” install, though some users note the thinner profile flutters slightly in high crosswinds.
-
Pros: Easiest installation for novices, allows wider window opening in rain, budget-friendly.
-
Cons: Slight flutter at speeds over 75mph, material feels less premium to the touch.
-
Price Range: $45 – $65. The perfect entry-level option for those testing the waters.
✨ Don’t Miss These Exclusive Deals!
🔍 Take your vehicle to the next level with these carefully selected products. Click on any highlighted item to check current pricing and availability. These tools will help you create authentic comfort your family will love!
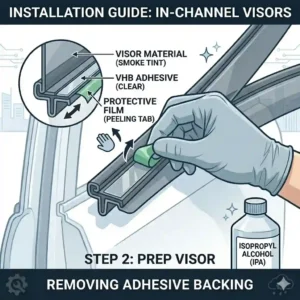
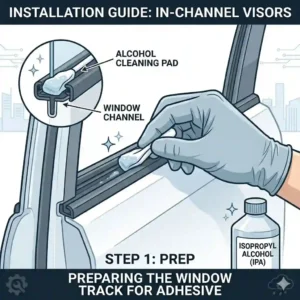
Practical Usage Guide: Flawless Installation & Maintenance
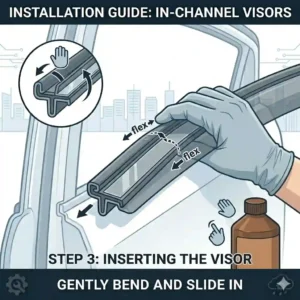
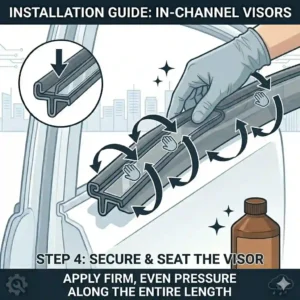
Installing these accessories seems foolproof—just shove them in the track and roll the window up, right? Wrong. The biggest complaint I see across all brands is the visor falling out or cracking the next day. This happens because of a failure in preparation and curing.
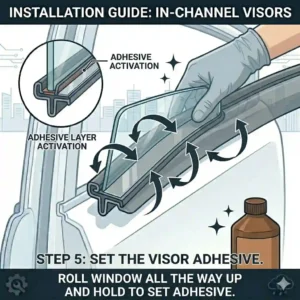
The 72-Hour Curing Rule:
When you install in channel window visors, whether they use interior friction tape or rely purely on tension, the vehicle’s rubber window seal needs time to reform around the new plastic insert.
-
Clean the inside of the channel with the provided alcohol prep pads. Do it twice. Dirt inside the felt track ruins adhesion.
-
Bow the visor carefully to insert the ends first, then walk the middle up into the channel.
-
Slowly jog the window up (do not use the auto-up feature).
-
The Golden Rule: Leave the windows rolled up and do not wash the car for at least 72 hours.
If you roll the windows down to hit a drive-thru on day two, the rubber seal hasn’t memory-molded to the visor yet, and the tension will pull the visor out of the track.
Maintenance Hacks:
After six months of daily use, dirt and road grime will build up between the visor and the glass, creating a micro-abrasive paste that scratches the top edge of your windows. To prevent this, wrap a microfiber cloth around a plastic trim-removal tool, spray it with a high-quality glass cleaner, and gently run it inside the channel gap once a month.
Problem → Solution: Beating Wind Noise and Sensor Bounce
Let’s address the two elephants in the room that every auto-accessory forum debates constantly: auto-reverse window sensors and increased wind noise.
Problem 1: The “Bounce-Back” Window
Modern vehicles have an anti-pinch sensor. If the window motor feels resistance (like a child’s finger), it rolls back down. Freshly installed deflectors create extra resistance, causing the window to bounce back constantly.
-
The Solution: You have to retrain the window motor. Roll the window up slowly by lightly pulsing the switch. Once it is fully closed, hold the switch in the “up” position for 5-10 seconds. This resets the sensor’s memory limit, teaching the car’s computer that the new resting place is slightly lower due to the plastic insert.
Problem 2: Highway Wind Whistle
Sometimes, after installation, you’ll hear a high-pitched whistle at 70mph. This isn’t the visor vibrating; it’s air sneaking behind the flange.
-
The Solution: This usually means the flange didn’t seat fully against the outer edge of the run channel. Take a heat gun (on low) or a hair dryer and gently warm the rubber seal around the exterior of the window frame. This softens the rubber, allowing it to snap tightly against the acrylic, killing the aerodynamic whistle.
Real-World Scenarios: Which Visor Fits Your Daily Drive?
To make this practical, let’s look at three distinct driver profiles. Matching the product to your actual lifestyle is the difference between loving and hating your purchase.
Profile 1: The High-Mileage Commuter
If you drive 400 miles a week on the interstate, your biggest enemy is fatigue and wind noise. You want to crack the window for fresh air without deafening roar.
-
Best Fit: WeatherTech Light Tint. Because it is machined to exact tolerances, it boasts the lowest aerodynamic drag coefficient. You won’t get that annoying highway whistle, and the optical clarity means your peripheral vision remains sharp during heavy traffic lane changes.
Profile 2: The Weekend Overlander
You drive a Tacoma or a Jeep. Your weekends involve gravel, low-hanging branches, and mud.
-
Best Fit: Goodyear Shatterproof. If a branch hits an acrylic deflector, it shatters. If it hits the Goodyear polycarbonate, it deflects. Plus, when you are sleeping in the back of the rig, you can leave the windows cracked 2 inches for ventilation without worrying about unexpected midnight rainstorms flooding the cabin.
Profile 3: The Dog Owner
You never drive anywhere without your Golden Retriever. You need the rear windows cracked constantly, regardless of weather, so the dog gets air, but you don’t want rain ruining your leather seats.
-
Best Fit: AVS In-Channel Ventvisor. The slightly deeper overhang and dark smoke tint give excellent rain protection while keeping the interior cooler. The tape-assist ensures that even if a large dog bumps his nose against the visor from the inside, it won’t dislodge.
How to Choose the Right Visor for Your Rig
When you start browsing, you’ll be bombarded with marketing jargon. Here is my personal, battle-tested decision framework for cutting through the noise.
-
Assess Your Window Regulators: This is crucial. If your car’s windows roll up slowly or make groaning noises, your motors are weak. Do not buy rigid, tape-less models. Opt for a thinner, tape-assisted model like the Voron Glass so you don’t burn out a $300 window motor.
-
Evaluate Your Climate: If you live in Arizona, UV stability is more important than flex. Cheaper plastics will turn purple and brittle under extreme UV loads. Look for heavy-duty, UV-stable acrylic like the EGR or WeatherTech.
-
Check Your Trim Package: Does your vehicle have chrome window trim or blacked-out trim? Some visors cover the trim completely, while others slide behind it. Make sure the aesthetic matches your vehicle’s trim level.
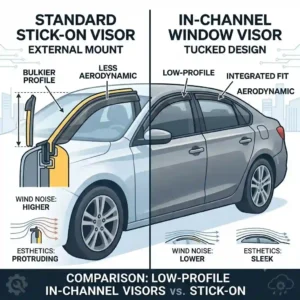
In-Channel vs. Tape-On Visors: The Definitive Breakdown
If you are researching deflectors, you will inevitably hit the great debate: should you mount them inside the window channel, or use double-sided tape to stick them to the exterior paint?
Tape-on (or stick-on) visors adhere to the painted door frame above the window. They are generally cheaper and don’t interfere with the window glass at all. However, from an engineering standpoint, they introduce significant flaws. Over time, UV rays degrade the adhesive. When you eventually remove them, they often leave a baked-on foam residue that requires an eraser wheel and compound polishing to remove—sometimes taking clear coat with it.
In-channel variants, on the other hand, boast a vastly superior aerodynamic profile. Because they are recessed, they create less wind drag. According to general aerodynamic principles, reducing blunt surface area limits turbulent air flow, which directly correlates to a quieter cabin. The spec sheet won’t tell you this, but tape-on visors look like an aftermarket afterthought, whereas recessed models look like factory-installed OEM equipment.
What to Expect: Real-World Aerodynamics and Wind Noise
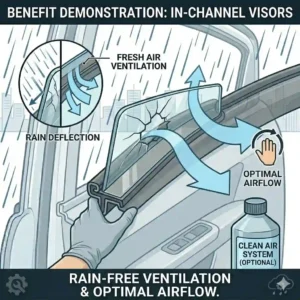
Let’s translate the specifications into everyday experience. The primary reason people buy these is to crack the window in the rain. But what actually happens to airflow when you install them?
Without deflectors, opening a window at 60mph creates a high-pressure zone inside the cabin. The air buffets, hurting your ears. When you install these deflectors, they act as an aerodynamic lip. They catch the slipstream and push it outward, creating a low-pressure vacuum right at the window crack. This literally sucks stale air (and cigarette smoke or fast-food odors) out of the cabin without blowing a hurricane onto your face.
However, be prepared for a slight increase in baseline cabin noise when the windows are fully closed. Because you are introducing a plastic ridge into a formerly smooth area, you will hear a faint wind whisper at speeds exceeding 75mph. It’s a small trade-off for the massive ventilation benefits.
Safety and Compliance: The D.O.T. Factor
Before you purchase the darkest tint available, consider the safety and regulatory implications. The A-pillar of your car is already a massive blind spot. Adding a dark, opaque piece of plastic right next to it can completely hide a pedestrian at a crosswalk.
This is why premium brands explicitly advertise D.O.T. (Department of Transportation) approved materials. As outlined by various .gov safety standard publications, automotive glazing and adjacent materials must meet specific light-transmittance criteria. If you buy a cheap, non-compliant knockoff from an overseas seller, you might fail your annual state vehicle inspection. Always prioritize optical clarity over aggressive styling if you do a lot of city driving.
Long-Term Cost & Maintenance
When calculating the total cost of ownership, look beyond the initial purchase price. A $40 set of budget visors seems great until the tape fails after 8 months and one flies off on the highway. Now you have to buy a whole new set, bringing your actual cost to $80, plus the headache of removing the remaining three.
If you invest in a $100 set of premium acrylic visors, the cost-per-year plummets. Maintenance is incredibly simple: wash them with regular car soap, but avoid aggressive automated car washes with stiff spinning brushes. Over years of use, acrylic will develop micro-swirls. You can restore them to brand-new condition using a standard automotive plastic polish or headlight restoration compound.
✨ Don’t Miss These Exclusive Deals!
🔍 Take your daily commute to the next level with these carefully selected products. Click on any highlighted item to check current pricing and availability. These tools will help you create authentic ventilation and comfort your family will love!
Conclusion
Upgrading your vehicle with high-quality in channel window visors is one of the most practical, high-ROI modifications you can make. Whether you are an overlander needing shatterproof polycarbonate to battle the brush, or a daily commuter seeking the optically clear, aerodynamic silence of D.O.T. acrylic, matching the right material to your specific driving habits is key.
Remember, the installation process is just as critical as the product itself. Respect the 72-hour curing rule, understand how to reset your auto-up window sensors, and choose a product that compliments—rather than fights—your vehicle’s window regulators. By stepping away from the cheapest plastics and investing in precision-machined deflectors, you guarantee a quieter, drier, and significantly more comfortable ride for years to come.
FAQs
❓ What is the main purpose of in channel window visors?
✅ They allow you to roll windows down slightly for fresh air ventilation while blocking rain, reducing wind noise, and mitigating interior heat buildup when parked. They fit directly inside the window track for a seamless, factory-like aesthetic…
❓ Do in channel window visors scratch the glass?
✅ No, the deflectors themselves do not scratch the glass. However, if dirt and road grit build up inside the window channel track, that debris can cause micro-scratches. Regular cleaning of the window track prevents this issue entirely…
❓ Why does my window roll back down after installing visors?
✅ Modern vehicles feature anti-pinch safety sensors. The new visor adds thickness to the track, triggering the sensor. You must reset the window motor memory by manually rolling it up and holding the switch for several seconds…
❓ Can I go through an automatic car wash with deflectors?
✅ Yes, most high-quality models can withstand touchless or soft-cloth automatic car washes. However, heavy-duty brush washes can potentially crack rigid acrylic or cause aggressive micro-scratching on the plastic surface over time…
❓ Are in-channel deflectors better than tape-on ones?
✅ Generally, yes. In-channel models offer a sleeker OEM appearance, better aerodynamics, and do not risk damaging your vehicle’s exterior paint or clear coat with harsh UV-baked foam adhesives…
Recommended for You
- 5 Best Sun Visor for Pickups in 2026: Expert Thermal Protection
- 5 Best house window rain guards of 2026 (Expert Review)
- 5 Best screens for vehicle windows: 2026 Expert Camping Guide
Disclaimer: This article contains affiliate links. As an Amazon Associate, I earn from qualifying purchases. If you purchase products through these links, we may earn a small commission at no additional cost to you.
✨ Found this helpful? Share it with your friends! 💬🤗